The Dreaded X-ray Machine

One of the biggest worries of the film photographer is that of traveling with film. We hear horror stories about not being able to find film, uneducated airport personnel pulling out dark slides and exposing film — and the dreaded X-ray machine. I see photographers talking about film and X-ray machines all the time on Facebook, and what I find most interesting is that very, very few photographers, even the grizzled warhorses who have lugged 4×5 rail cameras over hill and under dale to Capture the Shot from the Right Place, even know what film looks like when it has been affected by an airport scanner.

Now, I don’t purport to know everything there is to know about this subject, but I always take precautions when traveling with my film cameras, and I have never had a problem. Oddly, though, I did borrow film from a friend one day when we were out shooting, and when I processed it, a bizarre pattern showed on it and it took me a while and consultations with a number of people to determine that this was actually x-ray damage. Here’s what it looks like:

X-ray Damaged Film


X-ray Damaged Film


The pattern you see on the negative is apparently the oscillation pattern of the X-ray projector. It continues through the whole strip. My friend had just purchased the film from a local camera shop, so we’re still a little stumped as to how it came to be like this. The common wisdom is that film with ISO ratings of less than 800 is safe, and that if one is carrying ISO 1600 and higher to be cautious. This was Tri-X, which has a box ISO rating of 400, so the common wisdom would have failed anyway. I guess the exception does prove the rule, but I have never seen this happen while traveling, even with Delta 3200 film.

There are many products out there which claim to prevent X-ray damage, but I find that — at least inside the US — hand-inspections of film and cameras is the best bet. And not just for the safety of the film, but also for conversation. I travel a lot with weird old cameras, and I’ve met some wonderful people in the course of a hand inspection. On a trip to Charlotte some years ago, the TSA agent was hand-inspecting my film bag and a fellow traveler became interested. He told me he shot mostly digitally now, but occasionally he dug out his Horseman and ran some roll film through it, and as the conversation progressed I learned that this individual had actually studied for a time under Edward Weston… and when I finally stopped genuflecting towards him, the conversation lasted a couple of too-quick hours before we separated to board our different flights.

It’s a very interesting world, if you’re paying attention.

Junkyard Photoshop

The thing about Photoshop is that it’s too easy to get bogged down in creativity when working on images, and not get anything done.  At the Junkyard, we didn’t have much of a sky so I started in on a couple of images I really liked, two of Lauren and one of the amazing Elley Cat.  Elley was first; I loved her stance on the car, but I didn’t like the sky.

Elley Cat – Before


So I started playing around in Photoshop.  I pulled images I had shot before, elsewhere; all of the images that ended up as components of these final images are mine as well, so I don’t run into any copyright issues.  After finding what I feel is the best possible image, I ended up with this.

Elley Cat with a new background


This got me really excited about making fun stuff in Photoshop.  So I pulled a couple of Lauren’s Umbrella Corporation images.  Here are the before and afters of these.  If you can guess where the images were shot that ended up in the backgrounds of the composites, please leave your guesses in the comments and I’ll confirm or deny whether you’re right.

Cheap Thrills: Topcon Auto 100

Thrift stores can be a fantastic place to find cameras; I’ve bought some of my favorites at assorted thrift stores.  There’s a lot of junk there, too, but every once in a while I run across something really interesting or that I’ve not seen before.

This was the case one night when I stopped in at a thrift store in north Phoenix.  There was a number of cameras sitting out on the shelf, and another customer was dithering because she had registered for a photography class and didn’t know which to get.  I pointed her towards the K1000 in her left hand, and she put the others down and went and purchased the K1000.

Good choice.

I don’t remember what the other cameras were — which tells me they weren’t anything special — but a pair of lack leather cases caught my eye.  There were a camera and an extra lens in black leather cases that were clearly Japanese, resembling the school bags Japanese students carried to school when I lived there.

I had never heard of a Beseler Topcon Auto 100 before, but it did look like fun and it was cheap, which meant it wanted to come home with me.  As far as I can tell, the camera is complete down to the original skylight filter and lens caps, completely original, almost mint condition, and actually kind of pretty.  The leather strap appears to be original to the camera, and the little black leather case contains the lens hood.  Seems a lot of case for a little bit of hood.

IMG_4329

A Little History

Established in 1932, Topcon is a manufacturer of optical equipment for ophthalmology and surveying.  The company’s first camera was made in 1937, and Topcon released the first SLR camera in the world that featured TTL full-aperture metering.  In the 1960s, the US Navy selected the Topcon Super-D as its official camera, and continued to use the Super-D until production ended in 1977.  Currently, Topcon manufactures high-spec GPS, laser positioning, and medical equipment, but no longer produces cameras.

This particular model was released in 1964 in Europe as the Topcon UNI and imported into Australia and New Zealand by Hanimex RE Auto.  In the US, the Beseler Corporation. known primarily for its enlarger, imported it as the Auto 100.  The Auto 100 differs from most 35mm SLR cameras in that it uses a leaf shutter rather than a focal plane shutter.  A number of early 35mm SLRs employed this type of shutter, including the Kodak Retina Reflex series, the Zeiss Contaflex IV series, and others.

The main benefit of the leaf shutter is that it has no limitation on flash synchronization and can synchronize with a flash at any speed.  On a camera such as a Speed Graphic or Ricoh 500, this is a huge benefit for shooting with flash.  Within an SLR like this one, however, the mirror mechanism must get out of the way in order to synchronize with the shutter and allow the exposure, which negates the sync-speed benefits.  Additionally, the mechanism required to operate the shutter within the design of a 35mm SLR is extremely complex and therefore difficult to repair and maintain. Focal plane shutters are far less complicated and therefore more robust, and as a result leaf shutters have fallen out of favor with manufacturers. In this case, the maximum sync speed is 1/60, which is fairly normal for the era.

The lens is a 53mm f/2 lens and came with a 135mm f/4 lens as well.  According to my research, and 28mm f/4 and a 100mm f/4 were also available, but I have not seen those. The glass is beautifully clear.  I don’t know anyone else who has a Topcon of any kind, so it was a bit of a surprise when I was in an antique mall and ran across a 200mm f/4 telephoto lens in similarly excellent condition for a silly price.  I bought that one too.  My total investment in this camera is less than $50.

The “UV” lens mount is similar to that of the Kodak Retina Reflex III and the Zeiss Contaflex IV because of the leaf shutter arrangement, and the build quality appears to be solid and high quality. The shutter is tripped by a button on the front of the body which presses down rather than in. The other controls are pretty much in the locations one would expect them to be in, and so operation is fairly normal.

The Camera

IMG_4341

IMG_4332

Exposure is either fully manual or shutter priority; sliding the aperture ring to “AUTO” places it in shutter priority.  On the left side of the camera is a scale that indicates  aperture settings 2, 3.5, and 4 and the ASA ratings 25-400.  Setting the ASA rating is simple enough, but requires a bit of memory.  Pulling out on the metal tab on the shutter speed ring releases the ASA slider.  Simply move that slider so that the ASA rating of the film loaded matches up with the maximum aperture of the lens mounted on the camera. If the mounted lens is the 200mm f/4, the slider would be set to 4 and according to the manual, the meter would be accurate based upon the lens.  The downside of this is that this slider should be reset each time a different lens is fitted to the camera, something that I would naturally forget to do in the course of shooting.

Shooting with the Topcon

The first time I took this camera out, I was impressed with how it feels in my hands.  Unlike the Kodak and Zeiss SLRs, this one has a fun CLONK sound it makes when the mirror retracts after shooting.  Unfortunately, I had no idea how to set the ASA, so I discovered when I developed the film that I had set the meter wrong and all the negatives were underexposed.  So I had to go try again.

I’m not sure this camera works fully. The shutter appears slow on occasion; sometimes it fires as it should, and sometimes it seems sluggish.  It is a Seiko shutter, and I have rehabilitated quite a number of Seikosha shutters so I know what I’m doing with them.  But because it’s interlinked to the mirror mechanism, getting it off the camera to flush and lubricate it may be a bit of a challenge.  I have another Topcon camera — a Wink S Mirror — that has the same issues, and I may try to disassemble it one of these days and figure it out.

The aperture actuation seems a little sluggish on the 135mm lens, as well.  This gives me even more reason to one of these days tear into it and free it all up, and see what kind of images it gives me after a good cleaning.  Lenses are fairly simple mechanisms, so that part of it I think will be quite easy to do.

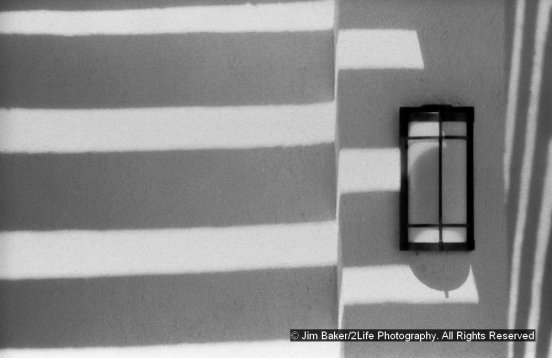
That said, when I did get images out of it, I quite love the way the images look.

Technical Details: 
Beseler Topcon Auto 100, s/n 54122978
UV Topcor 53mm f/2, s/n  54265070
Film: Arista.edu 100 (Fomapan 100)
Developer: Ilfosol 3, standard development
Scanned with an Epson 4490 scanner

img062aimg068img072

Shot with the 135mm f/4, s/n 13923345

img067

And finally, the 200mm f/4.  This image I particularly love.  It has a character that makes me fall completely in love with it.  It’s not the sharpest image in the world, but the look and feel of the image are lovely.

img091

When I start tearing into this camera, I will photograph all the steps and the procedure and document how it’s done.  I’ll blog the entire repair, and the success or failure.

Why I Shoot Canon Digital Cameras

Some years ago, I was in Sedona on a photowalk with my amazing daughter.  After the shoot, as we were waiting for the restaurant to open for lunch service, I was accosted by another photographer who demanded (yes, actually demanded) to know why I shoot with Canons and not Nikons.  More than a little puzzled by the vitriol he showed towards a particular camera manufacturer’s product, I found myself explaining myself and defending my choice of equipment.  Since then, I have discovered that there are photographers out there who are so wrapped up in their choice of equipment that they will actually refuse to photograph with a photographer who does not use the same gear they do.

Why?

I don’t know.  I think it’s pretty stupid, and it always annoys me when someone says “well, MY camera is technically superior to YOUR camera.”  Maybe this is one reason I love old cameras so much — the competitive photographer doesn’t have any reference to brag towards when he mentally compares his rootin’-tootin’ 1DX or D900 with my Speed Graphic or RB67.  I guess sensor size really DOESN’T matter.

I bought my first “real” in 1987, a Cosina CT-1 Super.  Cosina is a Japanese manufacturer that makes cameras which have been sold under the Ricoh, Pentax, Canon, Olympus, and Nikon brands as well as its own.  This particular Cosina is a Pentax K-mount body, very basic, and nearly indestructible, considering the many hundreds or even thousands of frames I have shot with this camera.  From the Cosina I progressed through a series of K1000s, ME Supers, P3Ns, and PZ70s, loving every Pentaxian minute of it.  But there were storm clouds on the horizon, and I was to discover that every one of those clouds had a silver halide lining.

When I started shooting weddings, I had been shooting with Pentax-mount 35mm cameras since that first Cosina, and was at the time shooting with the most current Pentax cameras.  I shot my first few weddings with these cameras on Kodak Portra films and absolutely loved the results.  One night, however, I was hired to photograph a wedding reception in a church hall, and the lights were so low that my Pentax camera could not pick up a solid focus in the darkness.  Frustrated, I started doing research and discovered that Nikon cameras have a focus-assist beam the body sends out to illuminate enough of the subject to allow the camera to lock focus, and Canon cameras use a beam built into the external flash unit to send out a matrix that interacts with the focusing system in the camera body to obtain a solid focus lock.  Not having a lot of money invested in my system, I decided to switch to Canon and purchased a brace of Canon Elan film bodies.  When I went digital a few years later, I already had enough Canon equipment that I continued to acquire Canon-compatible gear, until now I am completely outfitted with Canon.

So the short answer is that I shoot Canon professionally because my Pentax 35mm cameras would not focus in the dark.  The funny thing is that almost immediately after I replaced my Pentax with Canon, that Pentax’s shutter blew up and I never replaced it, for obvious reasons. I still have that Cosina, though, and it works perfectly, even with cracks in its plastic body and the scratches and wear of 30 years

The Mamiya C220: Best Bang for the Buck

My Mamiya C2 is balky at best.  The lens is good, the shutter strong, but it is unreliable in its film advance.  I’m not sure if it’s something I can fix, so rather than send it in and have it repaired, I bid on a C220 on eBay.  I have used the C220 before; it’s a big thing, much larger than other twin-lens reflexes, but it has advantages that make it preferable over other cameras.

First, the film transports straight across the film plane rather than rolling from the bottom of the camera, making loading easier and reducing the possibility that something will get onto the rollers and scratch the film.

Second, the camera has a metered advance and double-exposure protection, so although you have to manually cock the shutter after winding the film, you know that if it lets you shoot you’re not going to double expose.  (Yes, I know that double-exposure is POSSIBLE, but in general use it’s not.)  The C220’s big sister, the C330 — which I do not own — cocks the shutter with the winder as well, but it’s considerably heavier than the C220.  Considering that the lenses are exactly the same, it’s a bit of a no-brainer to get the C220 over the C330.

Third, and perhaps most importantly, the lenses are interchangeable.  This, to me, is important as I like to do many different kinds of shooting and while being stuck with one focal length can be a challenge, sometimes I like having a wide-angle or a telephoto available for more versatility.   Couple that with the fact that the C220 can take any of the wide range of Mamiya TLR lenses (even the very early ones), the bulletproof Seikosha shutters and the beautiful glass, and you have a real winner.

A while back, I took the C220 downtown to play with it.  I don’t shoot it as much as perhaps I should, but here are some images.

img832

img834

img841

img844

img845

Fun With Film: One Reason to Love Film


Three whole stops underexposed.  I was walking around in Jerome, Arizona, carrying my Mamiya C220s, one loaded with Ilford Delta 400 and the other with Portra 400.  Unfortunately, my meter had been bumping around and it had ended up set at ISO 50.

Duh.

So of course being the slave to technology I am, I went ahead and shot at the metered values, and it wasn’t until most of the way through the rolls that I realized that I was shooting three stops under.

Had I been shooting digitally, I would have truly been stuffed, as noise resides in the shadows and images that far underexposed would have likely been almost unrecoverable.  But when I got into the darkroom, I processed the Delta accordingly, and I told the processing lab to do the same with the color.  The images I got have a lovely look to them, very pretty and grainy.  The print I have of the pickup is amazing, and all of these images will be available for purchase in my shopping cart as soon as I get the cart up and running.

Enjoy:

img073aaimg483a1Aimg486a1


Mamiyaflex C2 Professional

The Mamiyaflex C2 was a groundbreaking twin lens reflex camera.  Unlike the Yashicamat, Graflex 22, and others, the C2 had interchangeable lenses and finders, and quite the list of accessories and lenses to go with it including flashes and pistol grips.  The C2 was made from about 1958-1962, so far as I can tell, and this one is in very good cosmetic condition for its age.  It came with its original leather case, has a standard waist-level finder and a normal 80mm f/2.8 Seikosha-shutter Mamiya-Sekor lens.  The body serial number is 78797and the lens serial number is 564675.  It has a really cool stamped metal lens cover, which I quite like.

Here’s the camera in question:

IMG_7650

Using one of these cameras takes some getting used to.  Everything is backwards, so composing the image initially takes some time.  I naturally tend towards a left tilt on my horizons, and there’s a nice little line across the viewfinder to help me level the shot. And since the shutter and the winder are not connected in any way, it’s REALLY easy to make a double exposure.  I have not yet done this but I expect as I use the camera more, it’ll eventually happen.

Image quality itself is what I would expect from an old Mamiya TLR: sharp throughout, good detail, and a nice square negative.   Here is a contact sheet of the first roll I ran through this camera.  I think there may be a strip from the second int here as well, but I can’t remember.  These were shot in September heading up towards Greer, Arizona.

IMG_003

The weird thing about the C2 is its film transport and winder system.  There’s a little lever under the film winding knob that has to be moved in order to advance the film to the next frame.  I’m not sure if I’m doing something wrong, but the first roll I ran though this camera came out beautifully but subsequent rolls are only half-exposed, and the images that are on the exposed half of the film are either overlapped by about 1/5 of the frame, or are so close to one another that there is no space between the images to cut the film. I just need to figure out the winding thing. I’m thinking if I wind twice for each shot, maybe it’ll work better.  I’m currently on the road with this camera and so I’ll try it and report.

In this pair of scans you can clearly see the film overlap problem.  I can still use the middle of the image, though, which is nice, I guess.

Mamiyaflex C2 overlap

Here are a couple of larger images — basic film scans with little touchup, only some spotting — that show the overall image quality.  The first is in a field north of Greer, AZ, and the other is a derelict Aeronca Chief at Glendale, AZ. Note that the Aeronca photo is only the middle of the lower image in the filmstrip scan.

img003a

img006a

I think that once I get this film transport thing figured out, this will be a great addition to my arsenal of photography equipment.

Fun with Film

I’ve been a camera collector for years. I love the feel of an old camera: the weight and precision of its metal body and lens barrel, the satisfying CHUNK of a mechanical shutter moving, the buzzing of a mechanical self-timer… they just feel right.

People keep giving me cameras because they will never use the old film ones again (if they ever did in the first place).  They multiply like rabbits in my living room, garage, photo equipment closet…  There are cameras everywhere. Most of them work, as far as I know, and so I decided to start actually using them.  I signed up for a film photography class so I could get used to a wet darkroom again, bought some film, and cleaned some very dusty lenses.

So here goes.  I’ll try to give as much information about the individual camera, film, processing, and so on as I can as I go through this.

First to the film.  Since this is more of an experiment than anything, I dug out my old bulk loaders and purchased some Kentmere 35mm bulk film.  For those who do not know Kentmere, it’s produced by Ilford, I believe, and it’s really quite inexpensive. This is perfect for me right now, because I do not want to be worrying about the dollars when running film through a camera that may or may not work.  For the medium format stuff (the 120/220) cameras, I use Kodak Tmax 100.  Tmax has been around forever and it’s always reliable.  Large format, well, I got some Ilford Delta 100 sheet film.

Chemistry is more than a little bewildering, and so initially I went with what we are using in the classroom darkroom: Sprint.  The Sprint stuff seems to work well enough, but I ended up getting a bottle of Ilford fixer (for reasons I’ll explain later) and I just last week got a packet of Ilford Microphen developer, which I’ve used before and I believe will give a little finer grain in the images during processing. If I think about it later, maybe I’ll run a side-by-side test of the two developers using films shot in the same conditions and developed with the different developers. We’ll see.

So, without further ado, on to the cameras!

Beautiful Images Printed on Aluminum Sheet!

I am excited to announce a couple of new products to my product line offerings. I’ll break this into two postings. First, this is an image that it actually printed on aluminum sheet — the print quality is amazing, and you really need to see it to appreciate how beautiful it really is. This image will go up on my wall as soon as I am finished writing about it!

Beautiful Aluminum Prints Now Offered!

Trashing the Dress

I am always looking for beautiful ways to make art and have fun at the same time, so when Alexandra contacted me to do a Trash the Dress session, I was all over it. Not only is she extremely beautiful, but we had the perfect location in mind and everything — weather, light, temperatures, and location — came together in a perfection that is truly rare. There are so many shots I love from this session that it’s almost impossible to choose which I love the best. So here is a small sampling.

The thing about Trash the Dress sessions is that it’s not actually necessary to destroy the dress; most times, and soiling that happens to the dress will come right out with a quick brushing or a cleaning, and in this case that’s exactly what happened. Alexandra’s dress, even though it was in the river, cleaned up just fine afterwards. So if you’re planning on keeping your dress, we can always find a way to do a unique, fun shoot in it and not do irreversible damage to it.

Alexandra Trash the Dress Session